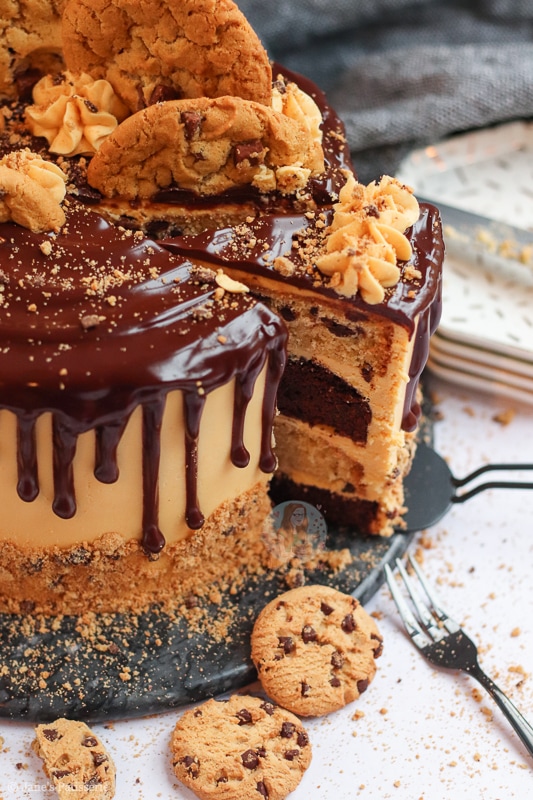
A delicious four-layer chocolate cookie cake with chocolate and chocolate chip sponges, buttercream frosting, chocolate drip and more!
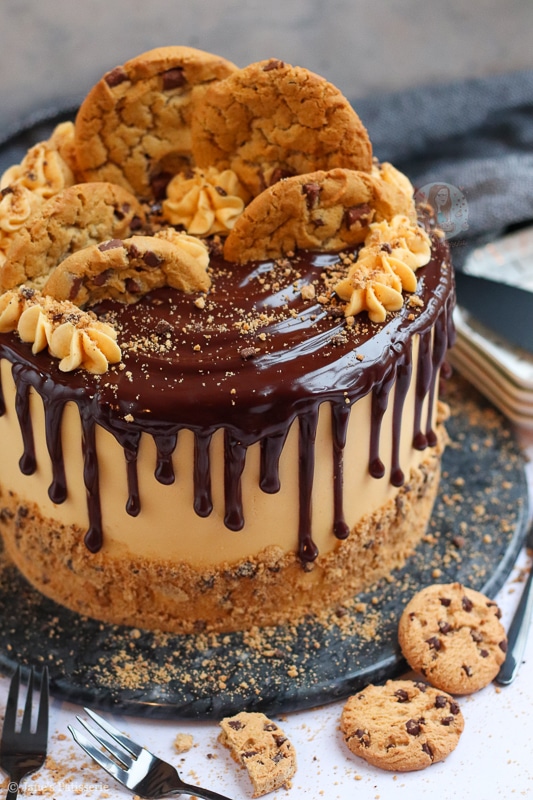
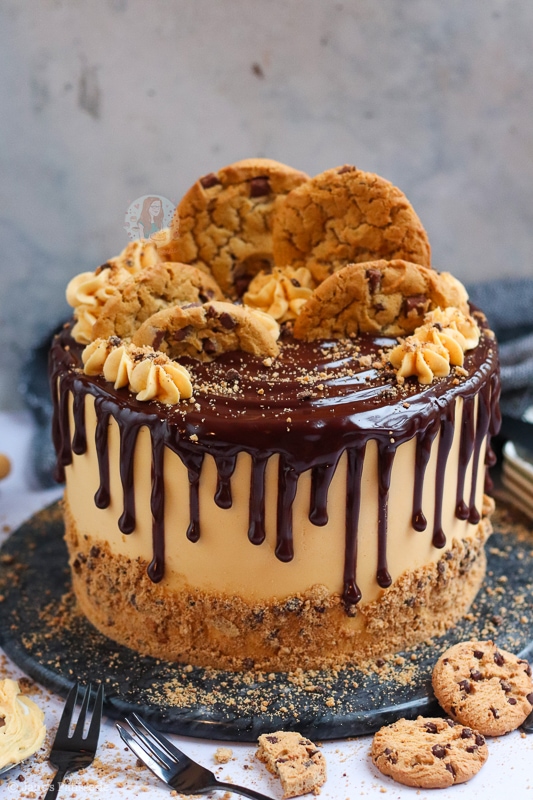
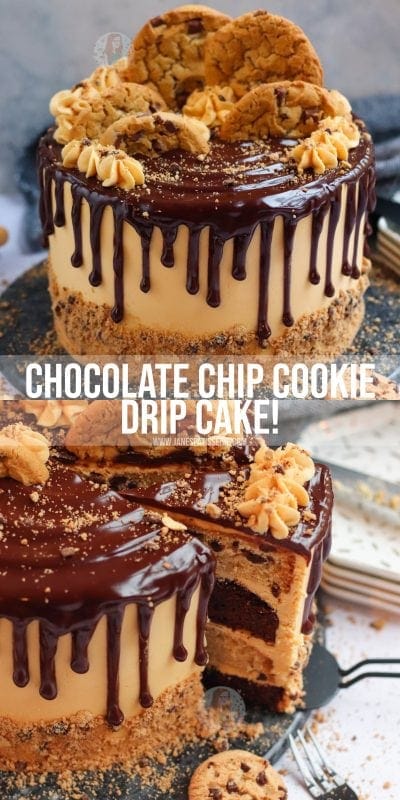
Chocolate chip cookie drip cake!
It’s the first recipe of 2022, and I thought I would start the year with an absolute bang and make something utterly delicious and indulgent… this beautiful chocolate chip cookie drip cake!!
I wanted to post a cake to start off the new year that I know you will all absolutely adore and will want to make for all of your celebrations this year. I did go maybe a little OTT on what’s involved in this cake, but like I said… starting the year off strong here.
Cookie cake sponges
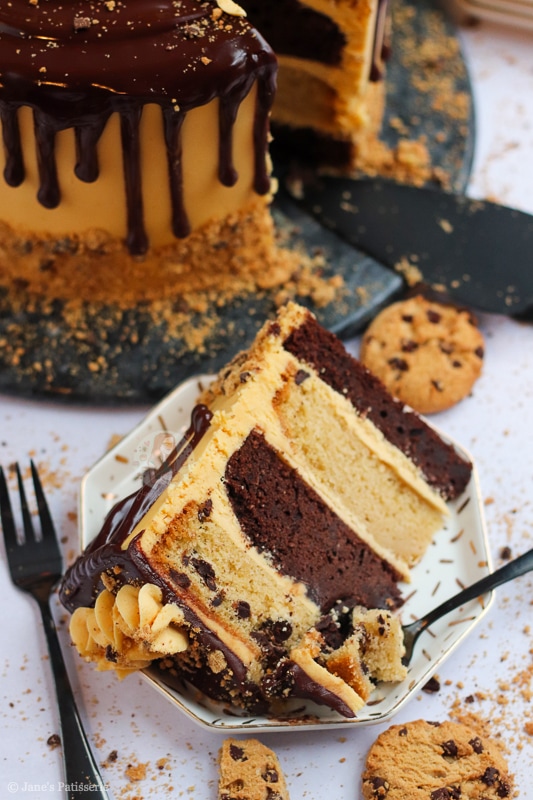
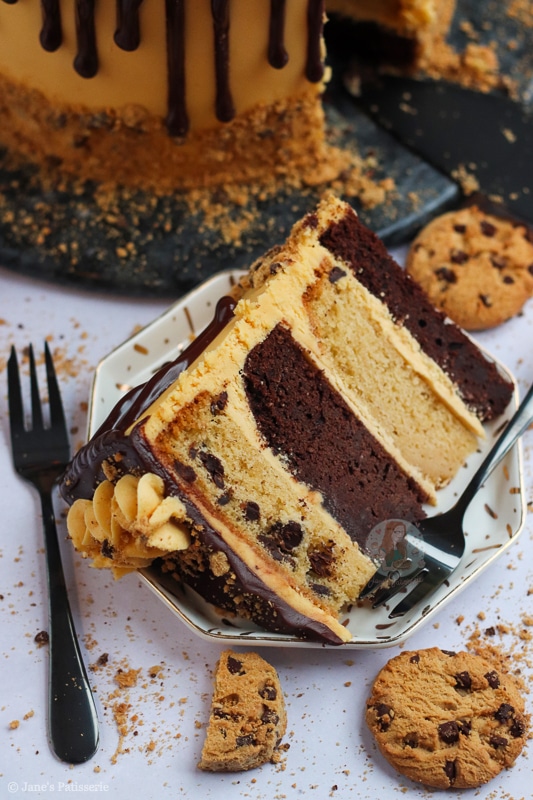
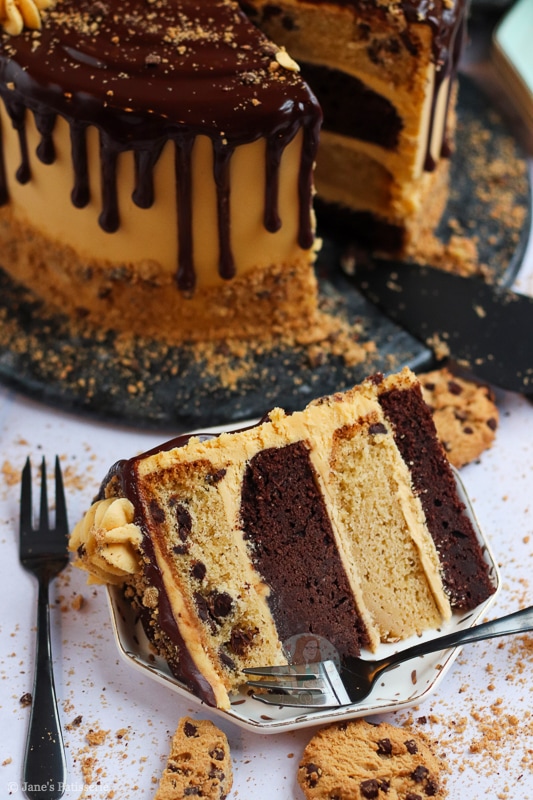
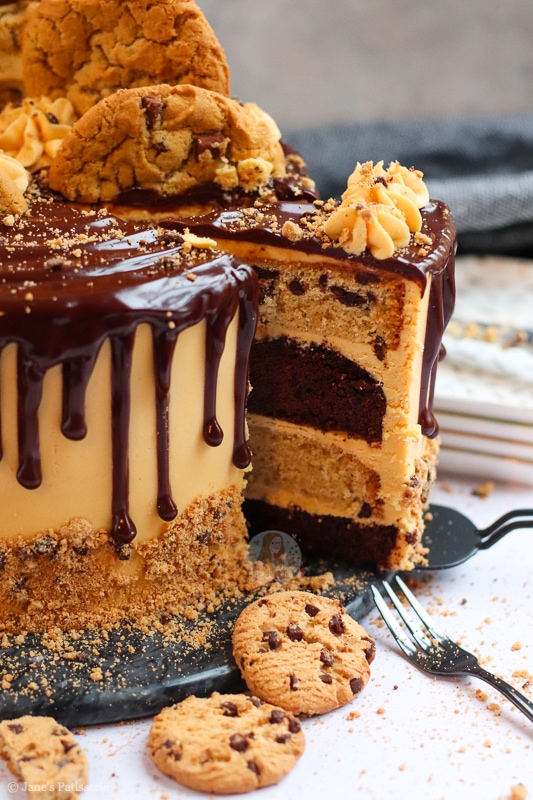
This cake is designed to fit the theme of chocolate chip cookies, but as it is a cake as well, I merged a few recipes and ideas to create this wonder. For the sponges, I followed the idea of my chocolate drip cake, but cookie-ified two of the layers. I thought alternating chocolate sponges and chocolate chip sponges was so fun!
I made the full mix of cake and split the mixture into two. The bowls of mix weighed roughly 1000g each, and to one I added 200g of chocolate chips, and to the other, I added cocoa powder – you can of course make them all chocolate chip, or all chocolate! It’s up to you. Simply double the chocolate chip quantity, or double the cocoa powder for the full mix.
Tins
I used these cake tins to bake this cake as when I am baking layers I tend to cut each cake into two layers – but you can split the cakes into four tins if you prefer. I have had these tins for years so I just like to stick what I find easiest!
If your oven can’t fit four cake tins at once though, it’s best to make each flavour sponge separately as cake mix should be baked immediately and not left to sit. The last thing you want is to have half a cake not as great as the other half – it would be rather upsetting!
6″ cake
I understand this is a very large cake, so if you wanted to make a 6” version, I would use a 300g mix instead of a 500g mix. This means you would use 300g unsalted butter, 300g sugar, 300g flour, and 5-6 medium eggs mixed together. You could then use 125g chocolate chips in the chocolate chip sponge, and 45g cocoa powder in the chocolate one.
Baking time is about 35-45 minutes at the same temp. I do love these 6” tins when making a smaller one too. For the decor, just use ⅔ of the decoration ingredients and follow the same steps! As always though, I love my 8” cakes and just freeze slices of leftover cake wrapped in clingfilm in a container so there is no waste.
Crumb coat
I use a small angled spatula to help spread the buttercream onto my sponges, and then to start doing the crumb coat – a crumb coat uses a small amount of buttercream to fill in any gaps in between your sponges, and create a smooth surface to then decorate on. It’s worth chilling the cake after the crumb coat to essentially ‘set’ it.
Using unsalted block butter for the buttercream is so important as you want the buttercream to stay relatively firm – using a baking spread or margarine is too soft, and will result in a bit of a sloppy looking cake! Make sure the unsalted butter is at room temp, and you’re good to go.
Buttercream
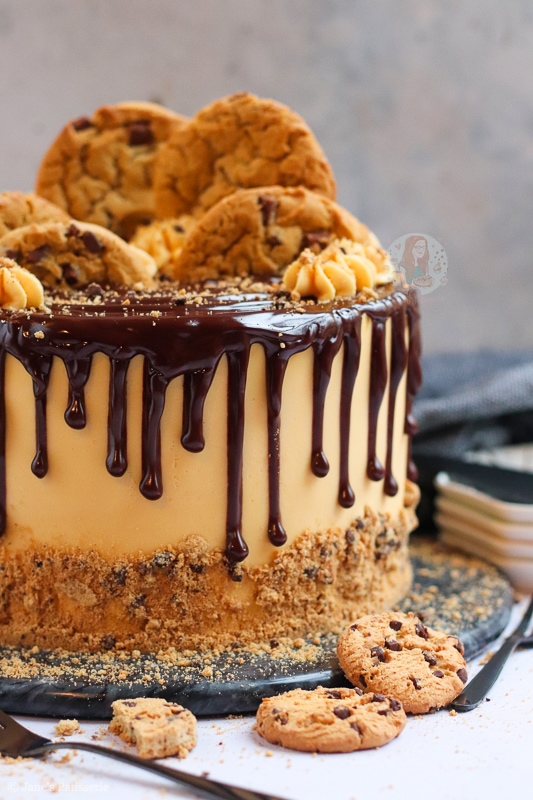
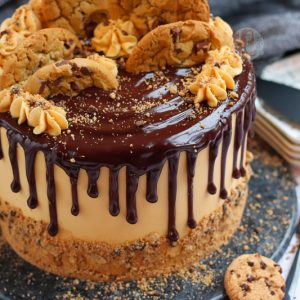
I coloured my buttercream slightly golden with an autumn leaf colour as I wanted it to be a bit more cookie coloured, but this is entirely optional. I just used some vanilla extract to flavour it, but you can use other flavours or you can even make it chocolate flavoured by replacing 75g of the icing sugar with cocoa powder!
I use another small angled spatula to cover in more buttercream – you want to pack the buttercream on, as when you use your large metal scraper to smooth around the cake, you will take buttercream off naturally – this leaves a smooth result! You can also, when very near the end, run your metal scraper under hot water and do a final smooth of the cake for a beautiful finish.
Ganache
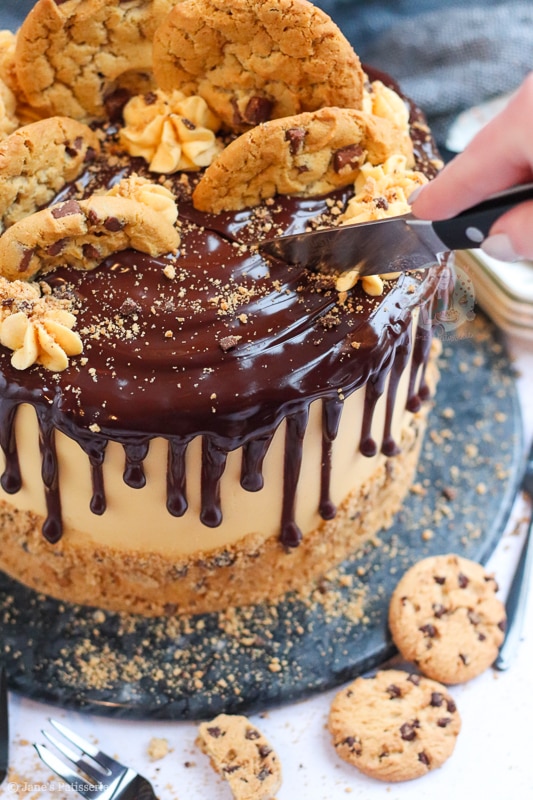
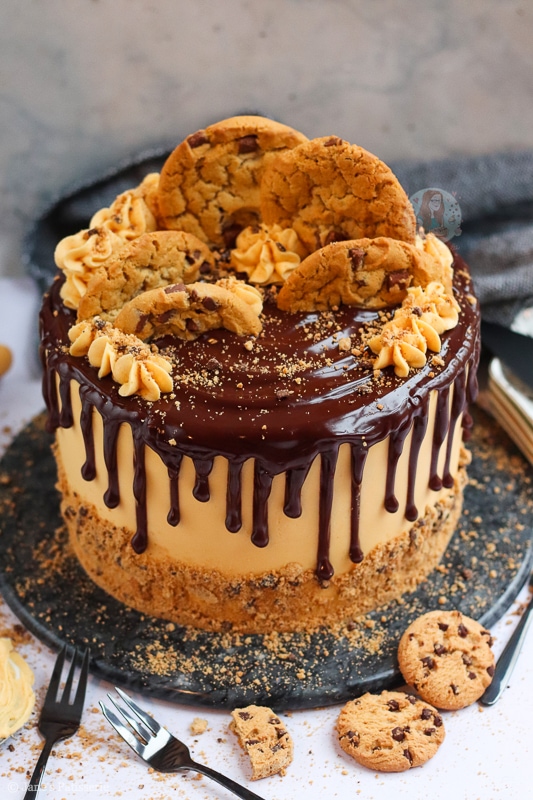
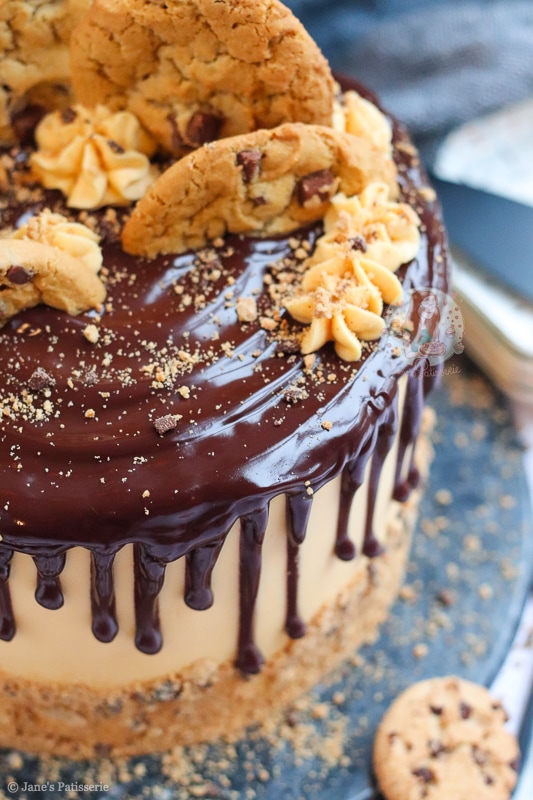
After the buttercream I tend to chill my cake again whilst making the ganache – I use the same ganache as always from my mini egg drip cake as it uses a mix of milk chocolate and dark chocolate, and creates the perfect drip!
I tend to use a small piping bag to do the drip for my cakes as I find it far easier. I pour the ganache in, and cut a small amount off the end – and drip! You aim the end of the piping bag on the edge of the cake and let it fall down the cake. The more that comes out of the piping bag, the longer the drip!
I then fill in the top of the cake with more ganache as it fills in the gaps, and creates even more delicious chocolate for every slice – this also acts as a nice glue for the cookies later on. You can use just a milk chocolate ganache (use 300g milk chocolate) or just dark chocolate (use 135g dark chocolate)
Cookies
For this cake I then press in some cookie crumbs to the bottom of the cake – I used shop-bought cookies as I wanted them to be quite crunchy and easier to press in. It’s a bit of a messy job, so be prepared – but I find it easiest to have a handful of crumbs and use the palm of my hand to press into the sides of the cake! I then just lightly take off the excess that has fallen onto my serving plate.
If you wanted to make your oven cookies for the decoration, I’d recommend my NYC Cookies – but you can also use shop-bought bakery cookies! I used whole ones, propped up by leftover buttercream, and ones I chopped in half. I used my 2d closed star piping tip to decorate randomly, with more cookie crumbs and I am obsessed with the finish.

Tips!
Once the cakes are baked and have cooled fully, I tend to cut them into their layers now as the cake is nice and easy to cut. I do tend to bake my sponges ahead of time, so if you are like me, you can freeze each layer wrapped well in clingfilm, and then a layer of foil. Sponges freeze really well! If you have frozen your sponges, you can decorate the sponges from frozen – but if you haven’t, no worries – you can just follow the steps in the same way.
It’s useful when making a cake like this to use a turntable because it makes the process of smoothing the outsides infinitely easier. I recommend this one at the moment as I use it all of the time! If you have any questions about the recipe then leave them below! I hope you love it. Also, have an amazing 2022! Jane x
Chocolate Chip Cookie Drip Cake!
#wprm-recipe-rating-9 .wprm-rating-star.wprm-rating-star-full svg * { fill: #343434; }#wprm-recipe-rating-9 .wprm-rating-star.wprm-rating-star-33 svg * { fill: url(#wprm-recipe-rating-9-33); }#wprm-recipe-rating-9 .wprm-rating-star.wprm-rating-star-50 svg * { fill: url(#wprm-recipe-rating-9-50); }#wprm-recipe-rating-9 .wprm-rating-star.wprm-rating-star-66 svg * { fill: url(#wprm-recipe-rating-9-66); }linearGradient#wprm-recipe-rating-9-33 stop { stop-color: #343434; }linearGradient#wprm-recipe-rating-9-50 stop { stop-color: #343434; }linearGradient#wprm-recipe-rating-9-66 stop { stop-color: #343434; }
Print Pin Rate
Ingredients
Cake
- 500 g unsalted butter
- 500 g light brown soft sugar
- 9 medium eggs
- 500 g self raising flour
- 2 tsp vanilla extract
- 75 g cocoa powder
- 200 g chocolate chips
Buttercream
- 500 g unsalted butter (room temp)
- 1000 g icing sugar
- 1 tsp vanilla extract
- 100 g cookies (crushed)
Ganache
- 75 g dark chocolate
- 75 g milk chocolate
- 150 ml double cream
Decoration
- spare buttercream
- sprinkles/cookie crumbs
- 4-5 larger cookies
Instructions
For the cakes
-
Preheat your oven to 170ºC/150ºC Fan, and line two 8″/20cm cake tins with baking parchment.
-
In a stand mixer, or a large bowl, beat together the unsalted butter and light brown soft sugar until light and fluffy.
-
Add in the eggs, self raising flour and vanilla extract and beat again until combined well.
-
Split the mixture into two bowls – they will weigh roughly 1000g each. Add the chocolate chips to one and stir, and add the cocoa powder to the other and stir.
-
Add each mixture to a prepared tin.
-
Bake the cakes in the oven for 50-60 minutes, or until baked through – check with a skewer to make sure they’re done!
-
Leave the cakes to cool in the tins for 30 minutes, and then take out and leave to cool fully on a wire rack!
For the Buttercream
-
Beat the unsalted butter on its own for minute or two, to soften it and loosen it.
-
Add in the icing sugar and vanilla extract and beat well until smooth and fluffy. I also coloured my buttercream golden using 1/2tsp of amber food colouring but this is optional.
For the Decoration
-
Once cooled, split each cake into two layers each.
-
Put the first cake onto a cake board of plate. Add a little buttercream and spread. Repeat with the second and third sponges. Add the final sponge on top. I did chocolate first, then chocolate chip and repeated.
-
Using a small amount of buttercream, spread and smooth around the cake sides and top for a crumb coat and add to the fridge for at least 30 minutes.
-
Once set, add more buttercream onto the tops and sides of the cake, and smooth around covering the cake completely in buttercream.
-
I add the buttercream on using a small angled spatula, and smoothed around the edge with the large metal scraper! You need to make sure there is more buttercream on the sides of the cake than you need, as some will be removed as you smooth it over.
-
Once finished, press the cookie crumbs into the base of the cake using the palm of your hand – this process is a little messy, but worth it!
-
Put the cake in the fridge again for at least 30 minutes.
Ganache
-
Add the dark chocolate, milk chocolate and double cream to a bowl, and microwave until smooth.
-
Using a small piping bag or a teaspoon, drip the ganache down the sides of the cake. The more you push over the edge, the further the drip will fall.
-
Set the cake in the fridge again for 30 minutes!
Decoration
-
Finish the cake off by piping on any leftover buttercream, and adding some whole cookies, and half cookies like I have, and then also some extra cookie crumbs!
Notes
- This cake lasts for 3-4 days at room temperature!
- For this Cake I used (affiliate links):
- I used two of these 8″ Cake Tins
- These piping bags for the buttercream
- These piping bags for the drip
- This cake turntable to make decoration easier
- I used this piping tip for the buttercream!
- I used this cocoa powder
- I used this dark chocolate
- I used this milk chocolate
- I used this autumn leaf colour for the buttercream,
- See notes on the post about how to make a smaller 6″ version of this cake!
ENJOY!
Find my other recipes on my Recipes Page!
You can find me on:
Instagram
Facebook
Pinterest
Twitter
Youtube
J x
© Jane’s Patisserie. All images & content are copyright protected. Do not use my images without prior permission. If you want to republish this recipe, please re-write the recipe in your own words and credit me, or link back to this post for the recipe.