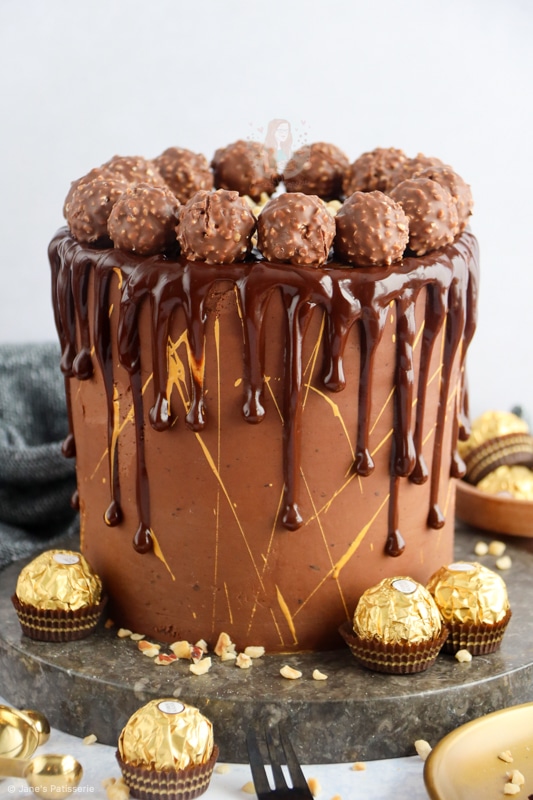
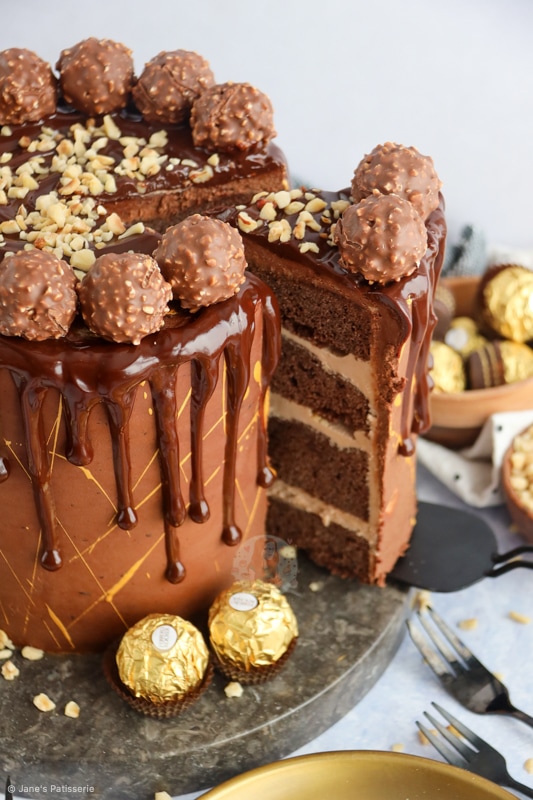
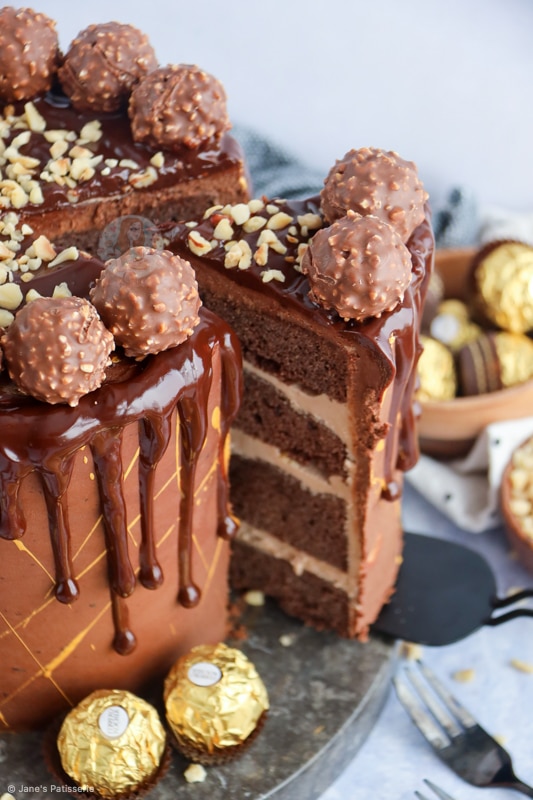
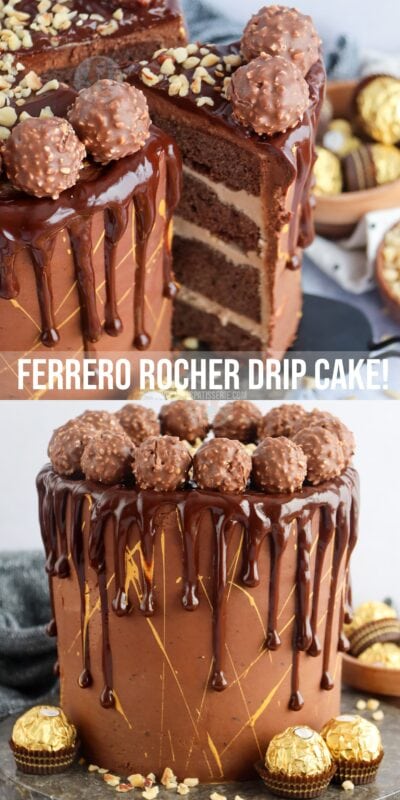
A delicious Ferrero Rocher Drip cake with four layers, Nutella buttercream, chocolate ganache and more!
Oh HELLO there… the recipe you have all been waiting for… my Ferrero Rocher Drip Cake! I made one of these many years ago for a friend’s birthday party and made the mistake of sharing the photo without the recipe, I’ve had requests weekly since aha!
But don’t worry, I have ~finally~ corrected that mistake and I am here with THE recipe of dreams – my ultimate Ferrero rocher drip cake. It is layers of absolute perfection, and I am completely and utterly in love with this recipe.

The sponges
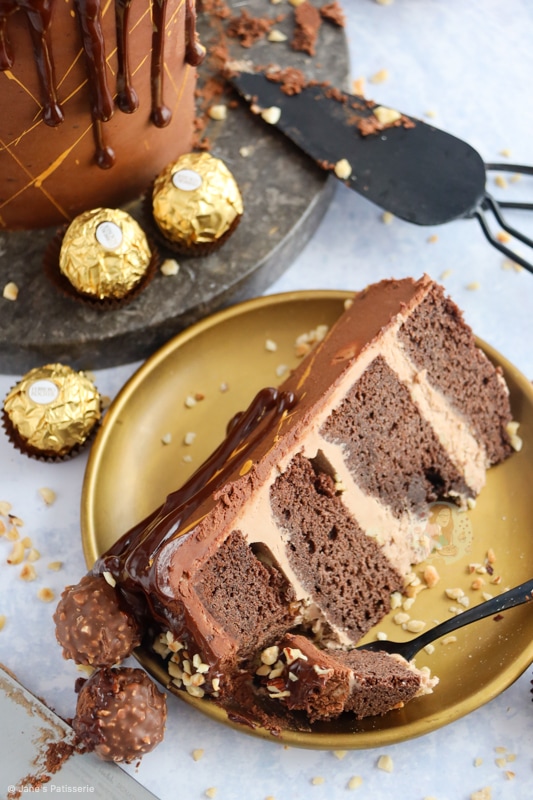
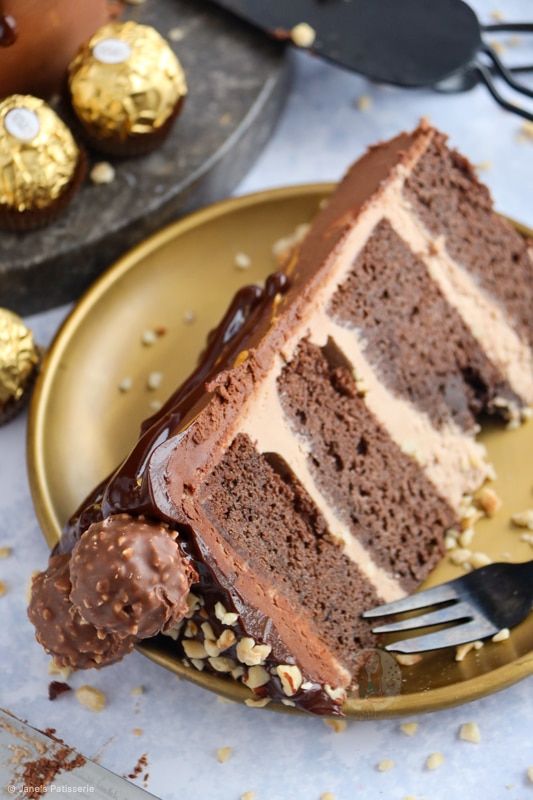
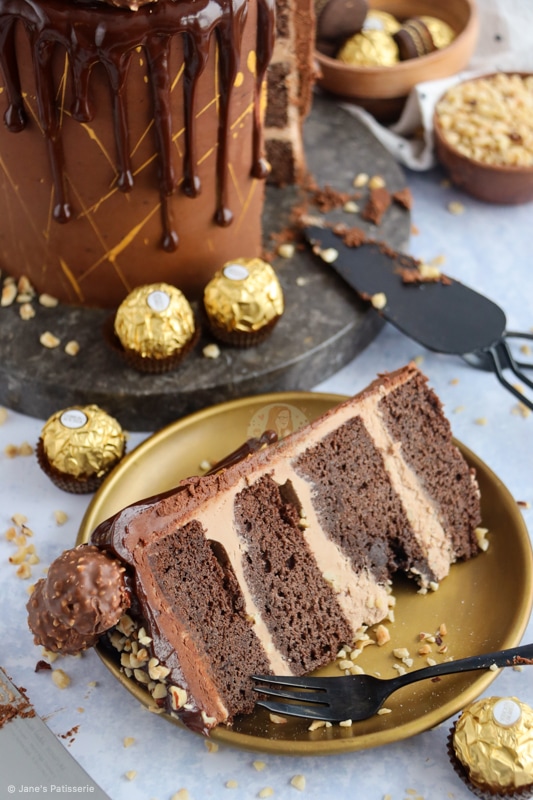
I wanted to make sure that this cake was similar to the cake I made all those years ago, so I went with a chocolate-themed sponge. I did make one major difference to what I made then, as well as what I usually post, and did 6” cakes.
I wanted to make my cakes 6” so that the cake was taller and thinner, as it worked well with the idea of the cake. I used these amazing cake tins (As I always do for my 6” cakes) and split a cake mix between two of them.
Generally, when I use an 8” base, I do a 500g mixture of sponge mix, and for 6” I do a 300g mix. For absolute best results though, you should weigh your eggs in shells and match the rest of the ingredients (but I find it’s not completely essential).
- Butter – I generally use baking spread or room temp butter when baking sponges – room temp block butter is best compared to fridge cold so you don’t have butter lumps, but baking spread can be used from fridge cold.
- Sugar – I use light brown soft sugar because it’s one of my favourite sugars to use in a chocolate sponge, but you can use caster sugar, golden caster sugar, or even dark brown soft sugar if you want a deeper flavour.
- Flour – I use self-raising flour as per normal! However, you can make your own by using 2 level tsp of baking powder per 150g of plain flour, whisked in before using in the recipe.
- Eggs – as always, I use the medium-sized ones. For this recipe I use 6 medium eggs, so you may want to use 5 large!
- Cocoa – I love using this cocoa powder because it’s got such a rich chocolate flavour, but most work well. Try to avoid hot chocolate powder though.
When you bake it, slightly lower and slower is best to create an even bake. When baked, and completely cooled, you can then easily split each sponge into two to create the four layers.
The buttercream
I went for a simple Nutella buttercream as Ferrero rocher is under the same family as Nutella, and the chocolate hazelnut flavour is the dreamiest of dreamy combos.
I use the same idea of a recipe as on my Nutella cupcakes – because it’s the best. I used the buttercream to fill the cake layers, along with some chopped hazelnuts, and to crumb coat the cake.
This is optional – but crumb coating makes things much easier. It seals in the crumbs when decorating the cake later on. I find it best to fill and crumb coat a chilled cake, but it can also be a frozen cake if needed (it can defrost later on).
The ganache
There are two types of ganache in this cake – but they actually use the same base! You do need to make them separately (which is slightly annoying I know) but it is totally worth it, I promise!
I use the same ganache mix as my mini egg drip cake and others like on my kinder Bueno drip cake. It uses a mix of dark chocolate, milk chocolate and double cream to create a wonderful flavour.
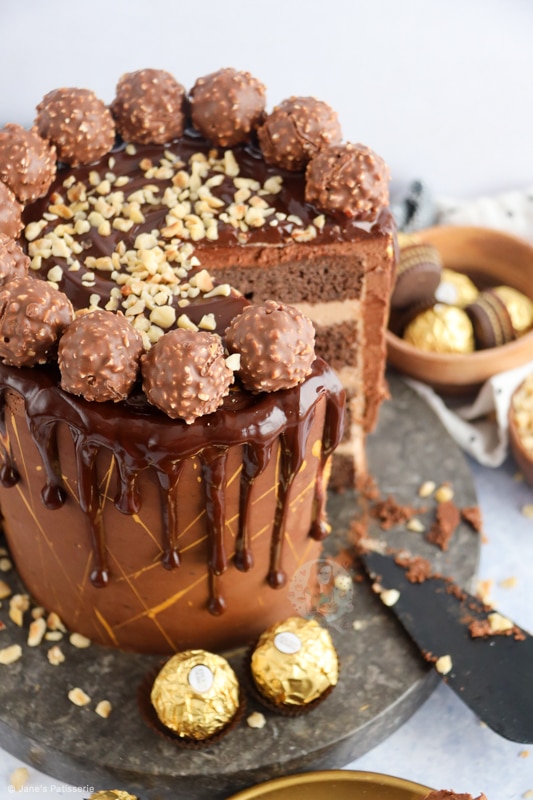
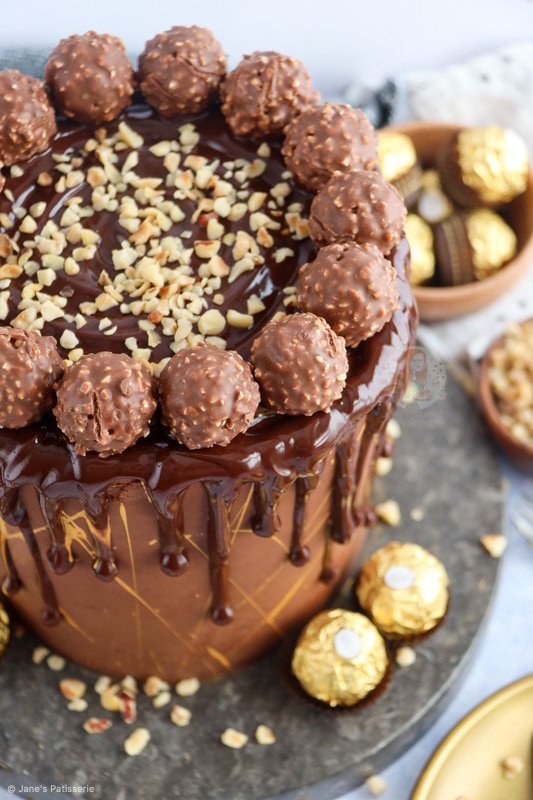
For the ganache that coats the cake, you make the ganache and let it sit/chill until it reaches a peanut butter consistency. Then, you can whip it with an electric whisk for a few minutes to create a silky smooth ganache to coat the cake with, or you can keep it darker and deeper without whipping. It just must be a peanut butter consistency.
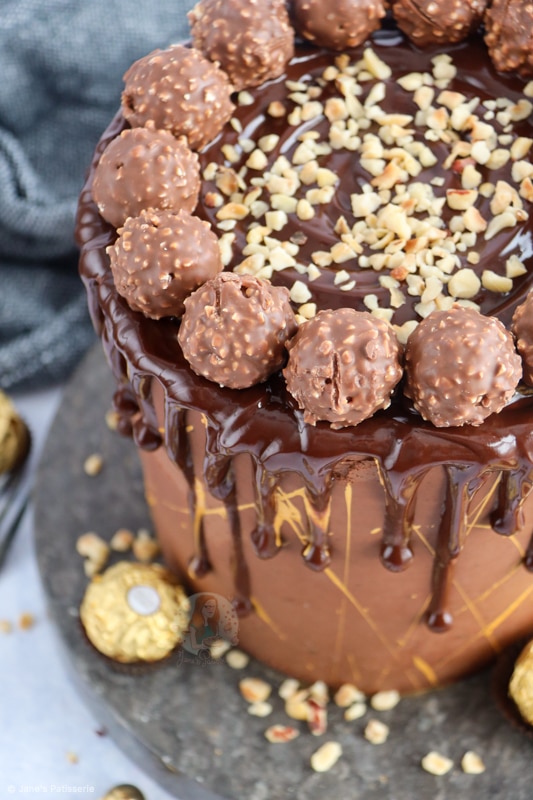
For the ganache you drip; once the cake has been coated and set, you make the drip ganache and drip it down the sides of the cake with an angled spatula or piping bag!
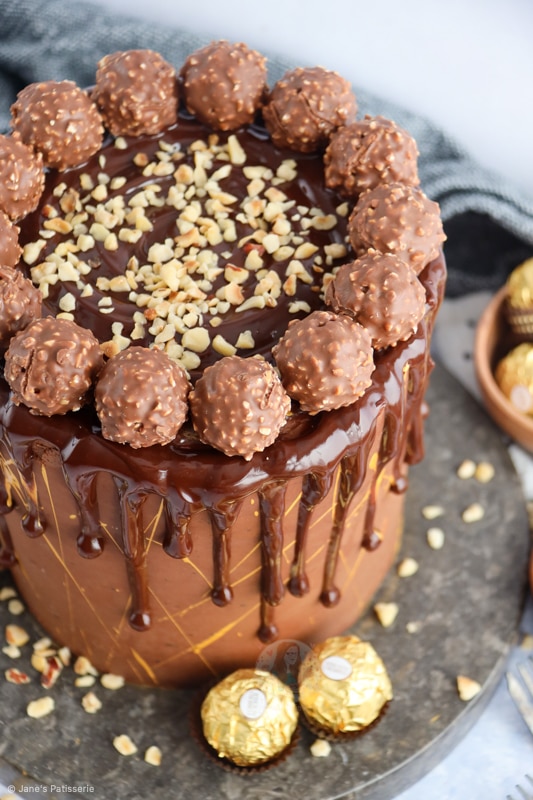
The decoration
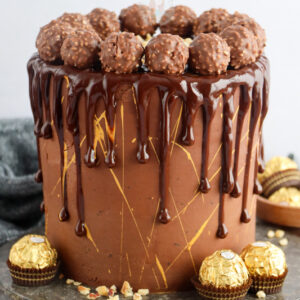
Before I did any drips, I decided to flick the cake with edible gold paint. This is again, optional, but I just love it! It’s a messy decoration to do, but so much fun. I’ve done edible paint flicked on cakes before and just adore it.
Because of all the elements to the cake already, for the final decoration after the drip I added on the thing we are actually here for… Ferrero rocher! How could I not?!
Yes I know, not much Ferrero rocher in here – but there doesn’t have to be. The flavours are inside and out of this delicious Ferrero rocher drip cake, and it looks like an absolute show stopper.

Tips & tricks
I used these 6” tins for this, as I love the size. If you want to make an 8” version, use this recipe as a base.
I used these metal scrapers and angled spatulas to create the perfect finish for the crumb coat and the ganache – along with a turntable as they make these sorts of cakes SO MUCH EASIER.
Any questions – leave them below in the comments!! Enjoy! x
Ferrero Rocher Drip Cake!
#wprm-recipe-rating-0 .wprm-rating-star.wprm-rating-star-full svg * { fill: #343434; }#wprm-recipe-rating-0 .wprm-rating-star.wprm-rating-star-33 svg * { fill: url(#wprm-recipe-rating-0-33); }#wprm-recipe-rating-0 .wprm-rating-star.wprm-rating-star-50 svg * { fill: url(#wprm-recipe-rating-0-50); }#wprm-recipe-rating-0 .wprm-rating-star.wprm-rating-star-66 svg * { fill: url(#wprm-recipe-rating-0-66); }linearGradient#wprm-recipe-rating-0-33 stop { stop-color: #343434; }linearGradient#wprm-recipe-rating-0-50 stop { stop-color: #343434; }linearGradient#wprm-recipe-rating-0-66 stop { stop-color: #343434; }
Print Pin Rate
Ingredients
Cakes
- 325 g unsalted butter (room temp)
- 325 g light brown soft sugar
- 265 g self-raising flour
- 60 g cocoa powder
- 6 medium eggs
- 1 tsp vanilla extract
Ganache
- 200 g dark chocolate
- 150 g milk chocolate
- 300 ml double cream
Buttercream
- 300 g unsalted butter (room temp)
- 600 g icing sugar
- 100 g nutella
Decoration
- 50 g dark chocolate
- 50 g milk chocolate
- 100 ml double cream
- gold food paint
- 12 ferrero rocher
- 200 g chopped hazelnuts
Instructions
Cakes
-
Preheat your oven to 170C/150C Fan, and line two 6″ deep cake tins with parchment paper.
-
Add the unsalted butter and light brown sugar to a bowl, and beat until light and fluffy.
-
Add in the self raising flour, eggs, cocoa powder and vanilla extract and beat again until a lovely smooth cake mixture is formed.
-
Split evenly between the two tins and bake in the oven for 35-45 minutes (or until a skewer comes out clean!)
-
Once baked, leave to cool in the tin for 10 minutes, and then leave to cool fully on a wire rack.
Ganache
-
Add the the dark chocolate and milk chocolate to a large bowl.
-
Add the cream to a pan and heat until just before boiling point. Pour over chocolate and leave to sit for 5 minutes. Once sat, mix until smooth (Add back to the pan if its not quite melted).
-
Leave the ganache in a bowl and stir every few minutes until it forms a peanut butter like consistency – you can do this in the fridge as well, just make sure to stir it so it doesn’t set too quickly!
-
You can also whip the ganache with an electric whisk to make it lighter and more mousse like.
Buttercream
-
Beat the unsalted butter on its own for a while in your mixer until its smooth and supple.
-
Add in your icing sugar a little at a time and beat fully until its light and fluffy.
-
Add the nutella and beat again until smooth.
Decoration
-
Level the cakes off if necessary. Split the two cakes into two so you have four layers in total
-
Add your first cake to a cake board or flat serving plate and secure with a small amount of buttercream.
-
Spread some buttercream onto the first layer, sprinkle on some chopped hazelnuts and add the second sponge. Repeat until you reach the top layer of cake.
-
Spread some buttercream around the sides to fill in the gaps and create a crumb coat. Refrigerate the cake for at least 30 minutes.
-
Once refrigerated and the ganache is ready, using an angled spatula, slather over the chocolate ganache and then smooth around using a large metal scraper.
-
Once the ganache is on, refrigerate the cakes for another 30 minutes.
-
Once set, flick some gold food paint onto the sides of the cake.
-
Add the the dark chocolate, milk chocolate and double cream to a jug and melt until smooth.
-
Using a small piping bag or spoon, drip this down the sides of the cake. Top the cake with the Ferrero Rocher and rest of the chopped hazelnuts.
Notes
- For this recipe I used:
- This cake will last for 3+ days
- If you want a vanilla sponge, look at this recipe
- If you want to make an 8″ version, look at this recipe
ENJOY!
Find my other recipes on my Recipes Page!
You can find me on:
Instagram
Facebook
Pinterest
Twitter
Youtube
J x
© Jane’s Patisserie. All images & content are copyright protected. Do not use my images without prior permission. If you want to republish this recipe, please re-write the recipe in your own words and credit me, or link back to this post for the recipe.