A four-layer vanilla cake with vanilla buttercream frosting, mini eggs, a chocolate drip and more – the perfect mini egg cake showstopper!
I posted a photo of a ‘drip cake’ a few weeks ago on my Facebook page, and you lot are OBSESSED with it (Thank you!). This led me to wanting to treat you to a delicious recipe that is not only a ‘drip cake’ but is a mixture of two of my favourite flavours, vanilla & chocolate. We all know they go so well together, and I just love the combination.
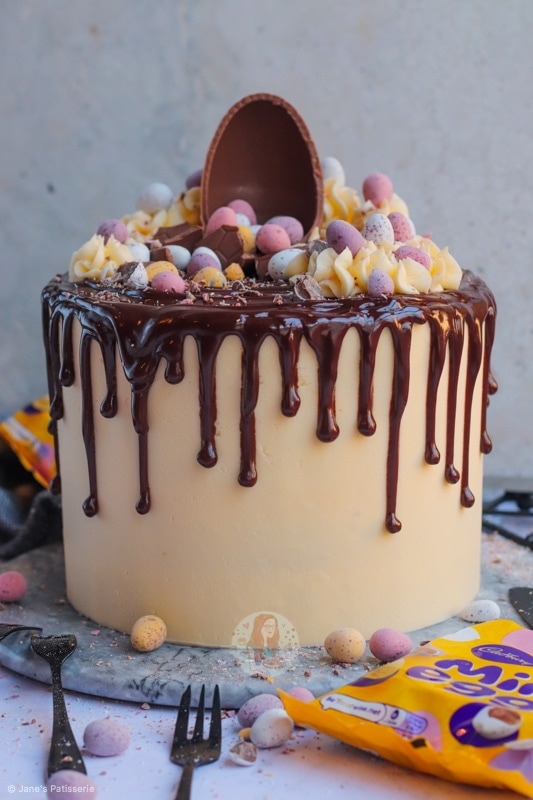
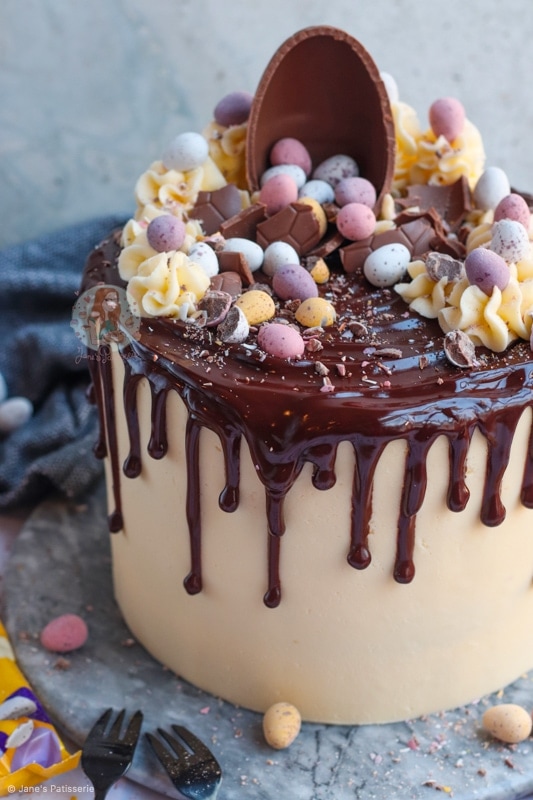
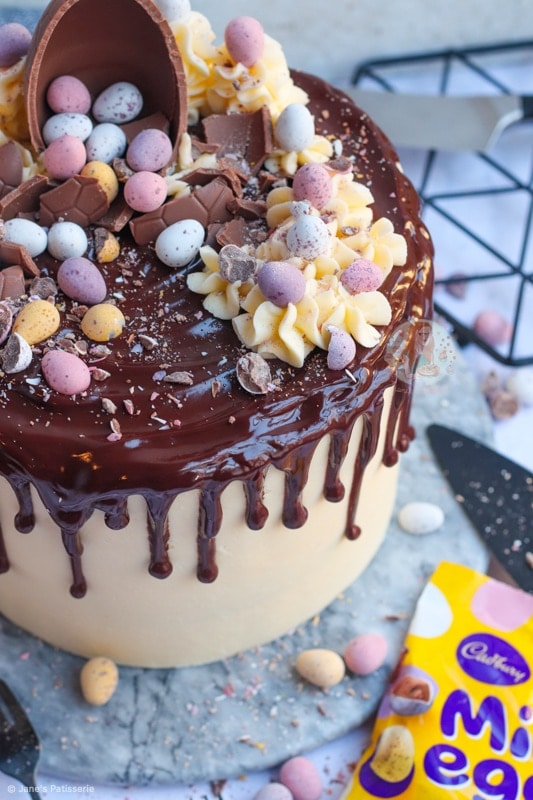
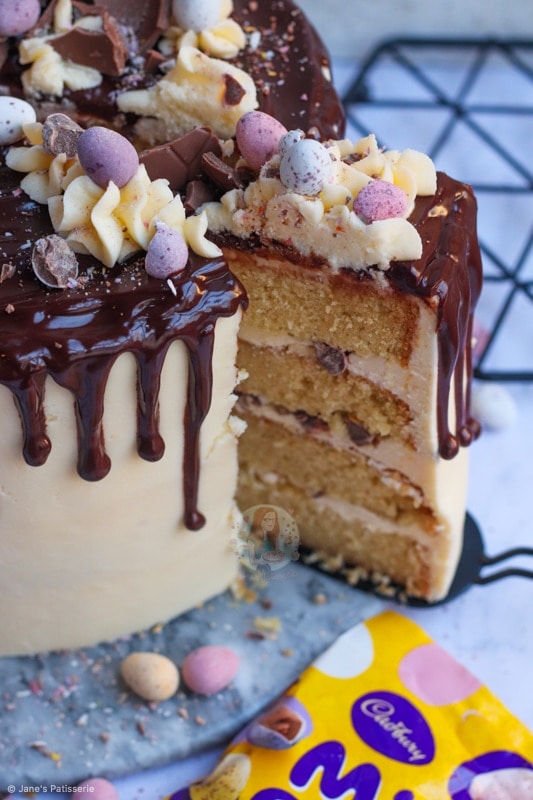
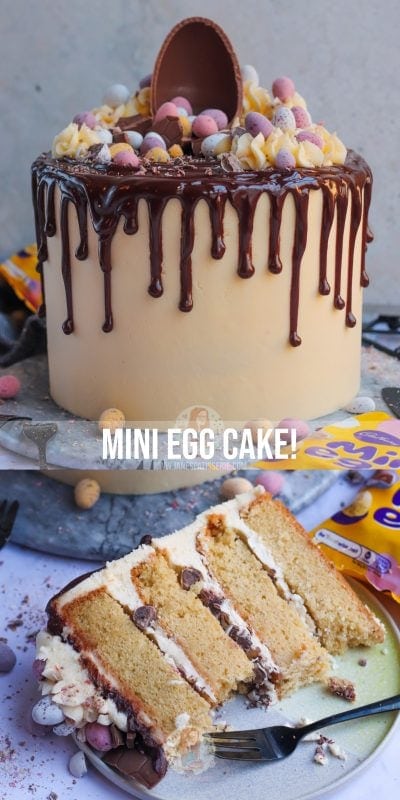
Of course, with it being close to Easter, I wanted the cake to be full to the brim of mini eggs as well. Yes, I realise you got that from the title of the recipe, but seriously… what could be better?! Four layers of cake, mini eggs stuffed in between with the buttercream, and a delicious chocolate drip on the outside.

I wanted to really start off my Easter baking this year with a bang, and I honestly think that this is the way. I know that there are thousands and thousands of drip cakes going across social media all the time, and the obsessions with them hasn’t really stopped. They always just look so good.
This may be partly my fault I won’t lie, as I am also obsessed – I much prefer these sort of cakes in comparison to regular fondant covered cakes as I love chocolate and frostings and all things delicious. You can have so much fun with the decoration on a drip cake, especially when its at easter and you can make it into a mini egg cake.
I decided that with this cake I would use a vanilla recipe for the actual cake as I wanted it to be something that most people would love. I went along with it and made the frosting vanilla as well, but I think the lighter colour of the frosting makes it very ‘Easter-y’ and the contrast with the dark chocolate ganache is amazing!
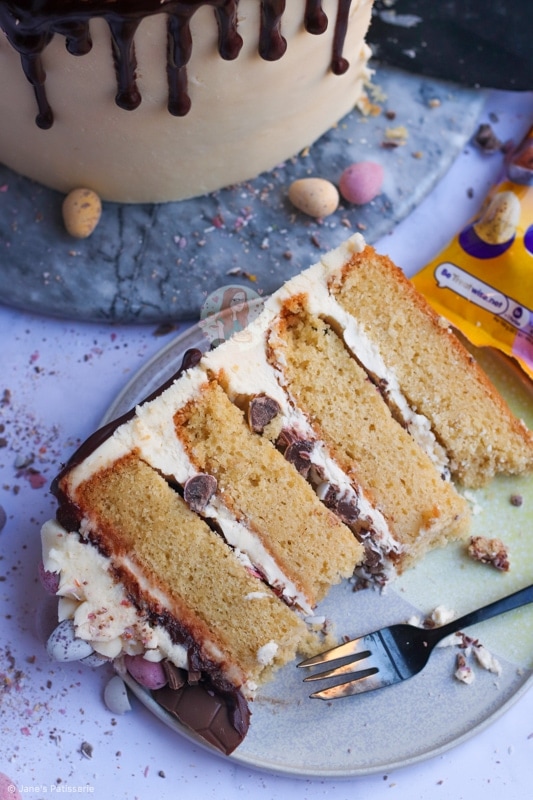
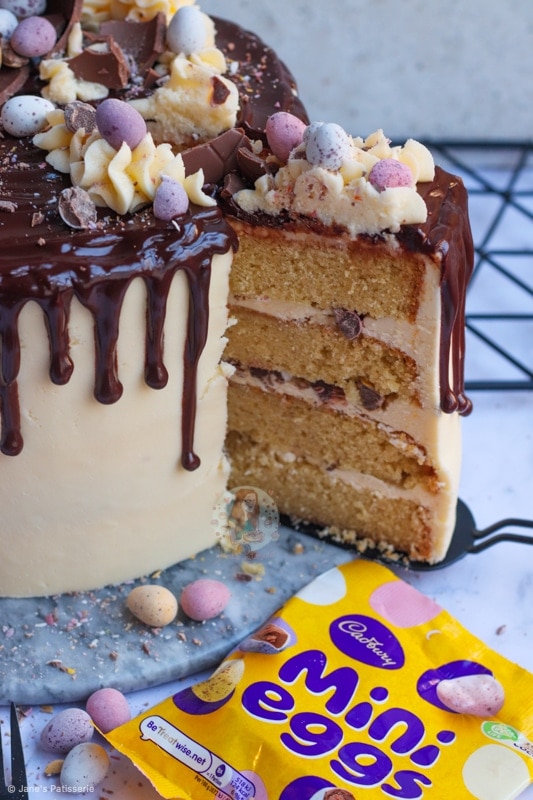
I based the recipe on my Victoria Sponge – Celebration Cake which has always been one of the most popular cake recipes on my blog. For four layers I always tend to use a 500g mixture of cake – so 500g butter, sugar, flour and eggs, with vanilla extract added in. For best results with a cake like this, you should weigh your eggs in shells and match the weight of the flour, sugar and butter to this weight (for example, 512g).
There is something so delicious about the simplicity of a vanilla cake, with a simple buttercream. I don’t usually bother adding vanilla to a buttercream like this as I often find that its Vanilla-y enough on its own, but its something you can easily do like I did. Or, you can even substitute 100g of the icing sugar for cocoa powder to it to make it chocolatey! The possibilities are endless with a recipe like this.
These sort of cakes can be utterly mind boggling to some people, and I can get that. The first one I made was an absolute disaster. Like, I question whether I should’ve eaten it its was a pile of smush, but hey… never waste anything! Baking a cake is always about practice and following the recipe for best results.
Seriously though, to get the perfect bake on a drip cake like this mini egg cake, you want to use the right tools. Without a shadow of a doubt, you will need a cake turntable. Along with this, I use a large metal cake scraper, and some small angled spatulas for best results, and oh my days it’s so much easier.
Honestly, using any of the tools makes life so much easier. If you like, you can do a thin crumb coat of the buttercream first, chill it, and then go over again in a thicker layer. This prevents the cake going with the buttercream and causing a failure. You don’t want your buttercream to be too thick, but its best to not have it too thin either. It’s one of those annoying things to say, but its true.
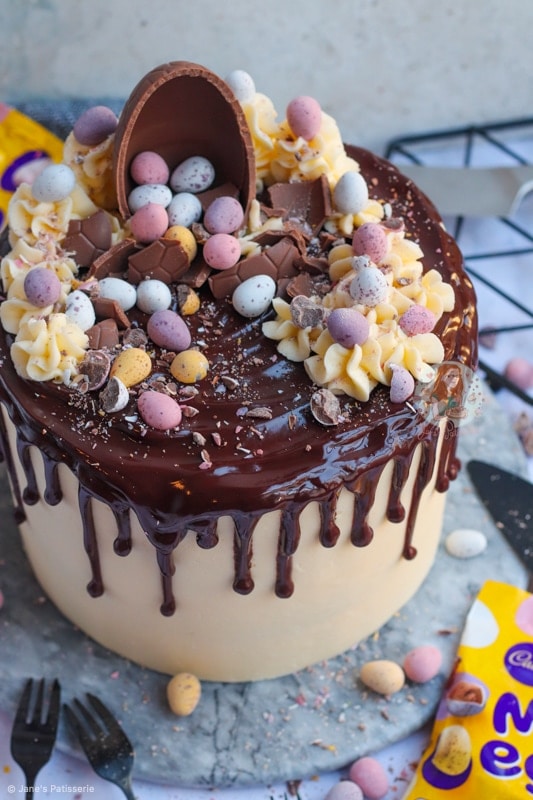
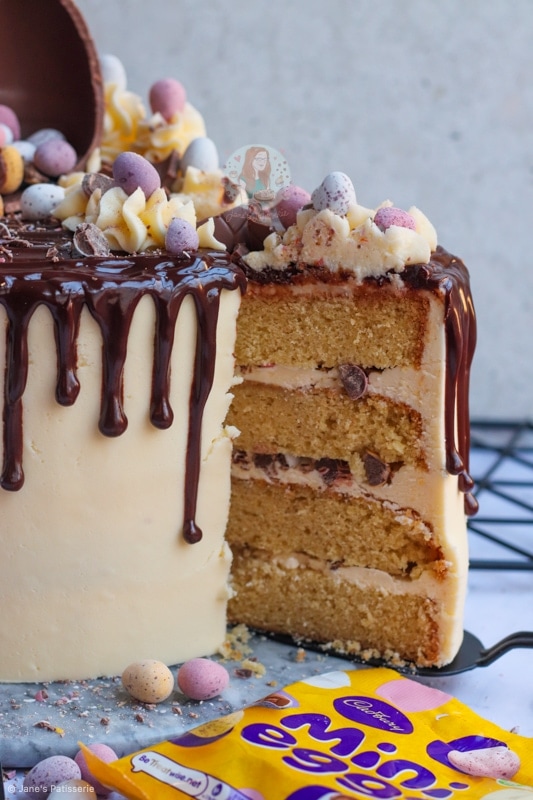
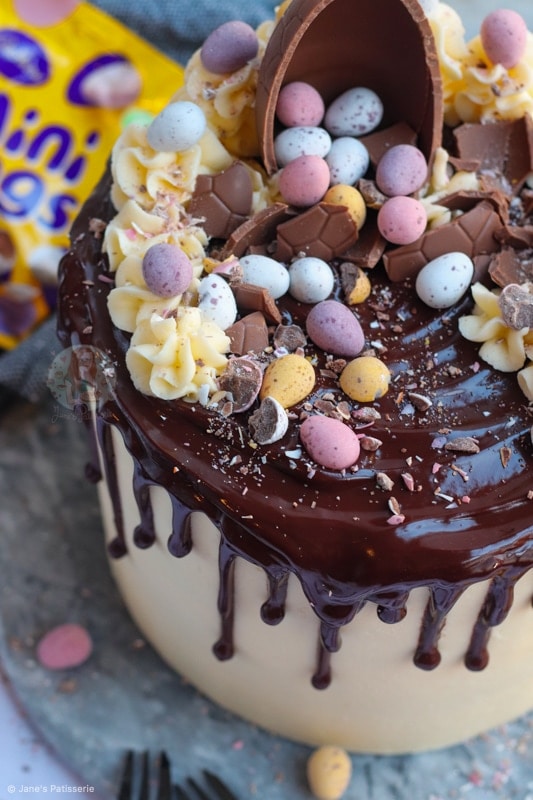
This cake also goes the extra mile because it has crushed mini eggs between the layers. And I mean come on, crushed mini eggs in a cake? YES PLEASE. I tend to get a layer of my sponge, spread on some of the buttercream, and add on some of the crushed mini eggs and repeat until the top of the cake.
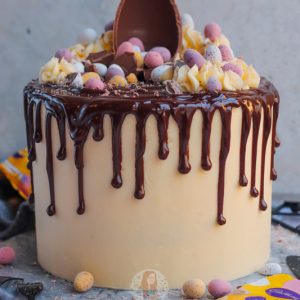
After the buttercream has been added around the edges and top of the cake, I add my drip. I use the same drip as on my other mini egg drip cake because it really is perfect. The mixture of dark chocolate, milk chocolate and cream creates the perfect drip texture in my opinion, and you can see how shiny it is from the photos!

Use a small disposable piping bag, I just snip off the end to do the drip, and then I will pour the rest of the drip into the top. I used a small angled spatula to create the pattern in the middle, by simply angling it and turning the cake turntable as I go, and slowly moving the spatula towards the edge of the cake.
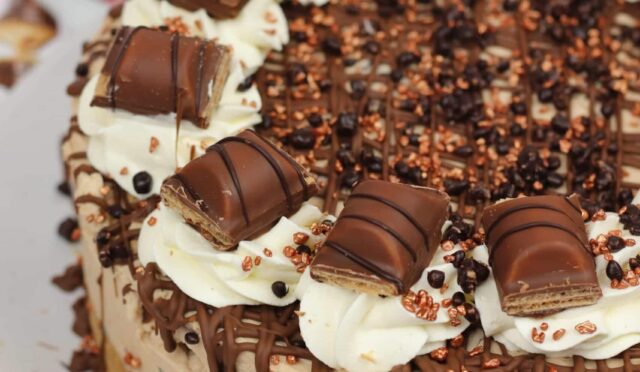
For the decoration I used a mixture of leftover buttercream and my 2d closed star piping tip, a small Cadbury’s Easter egg half (with the other half in shards), mini eggs and crushed mini eggs – and huzzah! Look at how cute it is, how perfect it is, and how obsessed I am with it.
Recipe updated February 2022
The original cake recipe was: 450g unsalted butter, 450g caster sugar, 6 large eggs, 450g self raising flour, 1 tsp baking powder and 1 tsp vanilla extract. The original buttercream ingredients were 350g unsalted butter and 800g icing sugar. The original decorations were 100g dark chocolate, 100g double cream, 300g mini eggs and 100g mini eggs crushed, along with a small Easter egg.
Mini Egg Cake!
#wprm-recipe-rating-5 .wprm-rating-star.wprm-rating-star-full svg * { fill: #343434; }#wprm-recipe-rating-5 .wprm-rating-star.wprm-rating-star-33 svg * { fill: url(#wprm-recipe-rating-5-33); }#wprm-recipe-rating-5 .wprm-rating-star.wprm-rating-star-50 svg * { fill: url(#wprm-recipe-rating-5-50); }#wprm-recipe-rating-5 .wprm-rating-star.wprm-rating-star-66 svg * { fill: url(#wprm-recipe-rating-5-66); }linearGradient#wprm-recipe-rating-5-33 stop { stop-color: #343434; }linearGradient#wprm-recipe-rating-5-50 stop { stop-color: #343434; }linearGradient#wprm-recipe-rating-5-66 stop { stop-color: #343434; }
Print Pin Rate
Ingredients
Cake Ingredients
- 500 g unsalted butter (room temp)
- 500 g caster sugar
- 9 medium eggs
- 500 g self raising flour
- 1 tsp vanilla extract
Buttercream Ingredients
- 500 g unsalted butter (room temp)
- 1000 g icing sugar
- 1 tsp vanilla extract
Decorations
- 75 g milk chocolate
- 75 g dark chocolate
- 150 ml double cream
- 300 g Mini Eggs (Crushed)
- 100 g Mini Eggs (Whole)
- Small Easter egg
Instructions
For the Cake!
-
Heat the oven to 170ºc/150ºfan and line two DEEP 20cm/8inch cake tins with baking parchment – leave to the side.
-
In a stand mixer, beat together the unsalted butter and aster sugar until light and fluffy.
-
Add in the self raising flour, eggs and vanilla extract and beat again briefly until combined – try not to overbeat!
-
Divide the mixture between the two tins and smooth it over – bake for 50-60 minutes, or until the cake is golden and when the cake springs back (skewer should also come out clean).
-
Once baked, leave the cake to cool in the tin for 10 minutes, and then remove and leave to cool fully on a wire rack.
For the Decoration!
-
In a stand mixer, beat the unsalted butter on it’s own, with an electric mixer for about 5 minutes so it’s supple.
-
Add in the icing sugar, and vanilla extract, and continue to beat so it combines.
-
Keep beating the buttercream for 5-6 minutes on a medium speed so it starts to get fluffier and lighter. If too thick, add one tablespoon of boiling water at a time till its smooth enough.
Decoration
-
Once the cakes have cooled, level them off so that they are flat, and then divide the cakes into two – so I end up with 4 layers.
-
Add the first layer of cake to your board with a small spoonful of buttercream underneath to act as a glue.
-
With the first layer of the cake, spread some of the buttercream onto the top of the first layer and sprinkle on 1/3 of the crushed mini eggs.
-
Add the second cake on top, and then top again with some of buttercream and mini eggs etc until you reach the top layer. Only use about 1-2 tbsp of buttercream per layer so that you have enough to decorate with!
-
Using a small amount of buttercream, do a crumb coat on the cake by smoothing as little as possible around the edges and top of the cake with ana angled spatula. Chill the cake in the fridge for 30 minutes after this.
-
Once chilled, spread more buttercream around the edges and top of the cake, and smooth with a large metal scraper until you have a smooth edged finish. Chill the cake again for 30 minutes.
-
Once finished, make the ganache – add the dark chocolate, milk chocolate and double cream to a small bowl/jug and heat on a low heat in the microwave until smooth (stir often).
-
Gently pour/pipe the ganache around the edge of the cake to cause the drips, and pour the rest onto the top and smooth over/create a pattern.
-
Pipe on any leftover buttercream how you like, add an Easter egg (I did half standing up, and then the other half broken into shards like it had exploded), and add mini eggs all over.
Notes
- If your ganache isnt fully melted after the mixing the chances are that the cream wasn’t hot enough – heat it for 10 seconds at a time in the microwave until its smooth. Its important to leave it to cool before decorating the cake otherwise it might melt the cake.
- As its for easter, you could easily dye the frosting a pale shade of pink, blue, etc – add in a little of colouring as you’re whipping the frosting up!
- All of the decorations are completely optional – but I love this style of cake! (You can also make half of the recipe to make a smaller cake, as this is a beast… but it really is a showstopper!)
- I bake the cake at 150ºfan in my oven as its a deeper cake, and it makes it bake flat. It also tends to stay moister. If you’re in a rush you can bake it at the usual temperatures, but adjust the baking time accordingly.
- This cake will last in an airtight container for 3 days, at room temperature.
- Recipe updated February 2022 – notes on the post for the original recipe.
- For this cake I recommend using:
ENJOY!
Find my other Cake & Easter Recipes on my Recipes Page!
You can find me on:
Instagram
Facebook
Pinterest
Twitter
Youtube
J x
© Jane’s Patisserie. All images & content are copyright protected. Do not use my images without prior permission. If you want to republish this recipe, please re-write the recipe in your own words and credit me, or link back to this post for the recipe.