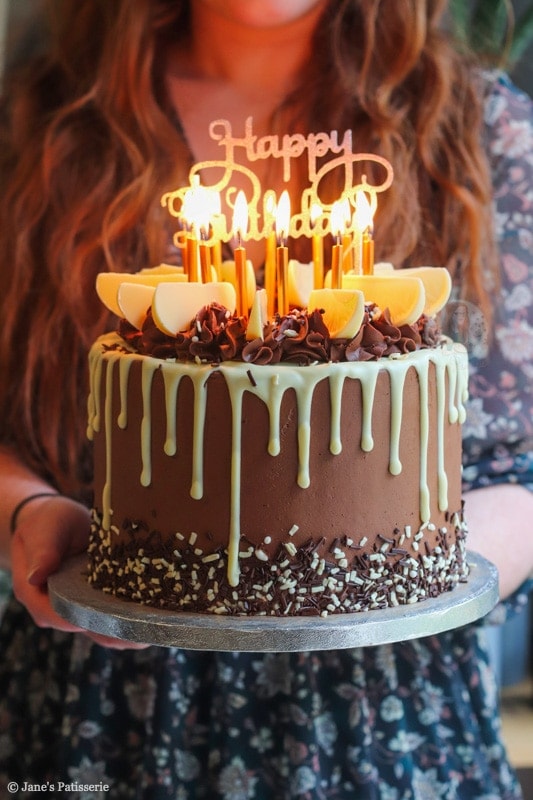
A recipe for my 28th birthday cake… chocolate cake, chocolate buttercream, chocolate orange ganache and more!
My 28th birthday!
Today (20th October) is my birthday… and this year, I am 28! It’s been a strange old year for everyone, but it definitely feels strange that it is my birthday again already! It genuinely feels like it’s only been a few months since I turned 27.
Anyway… I decided to bake my own birthday cake again (because I do basically every year), but also I know you guys love my birthday cake posts! This year I went for a chocolate and chocolate orange themed cake, sort of using up what I had in the cupboards, and making it up as I went a long!
Cake
It’s fairly similar to my 27th birthday cake from last year, but also my the bottom tier of my two-tiered celebration cake! I am an absolute creature of habit when it comes to baking cake, and with the limited edition white chocolate orange out at the moment I wanted to incorporate them somehow!
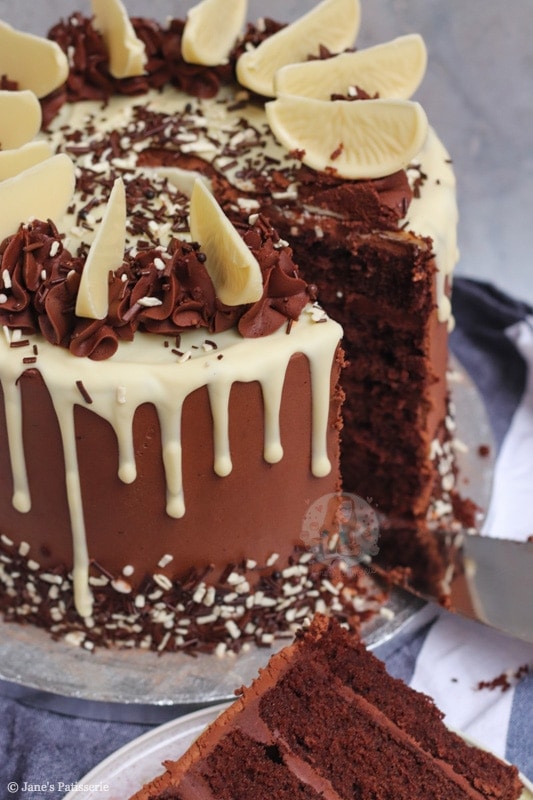
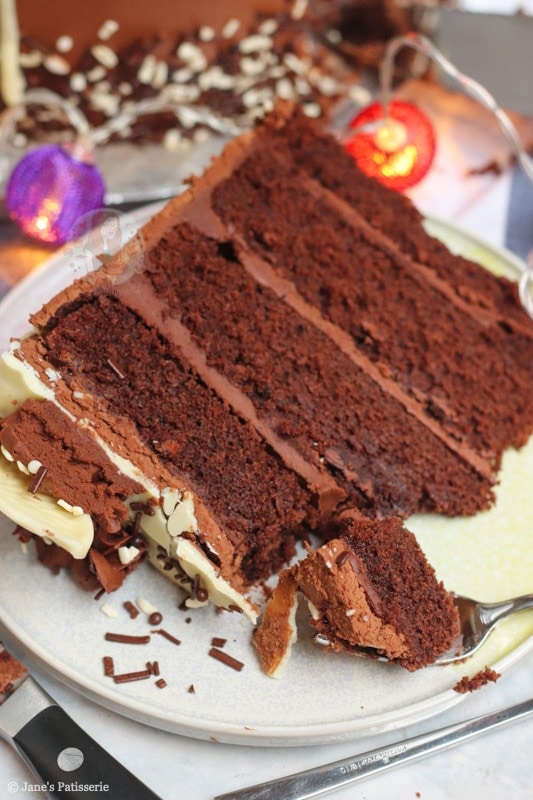
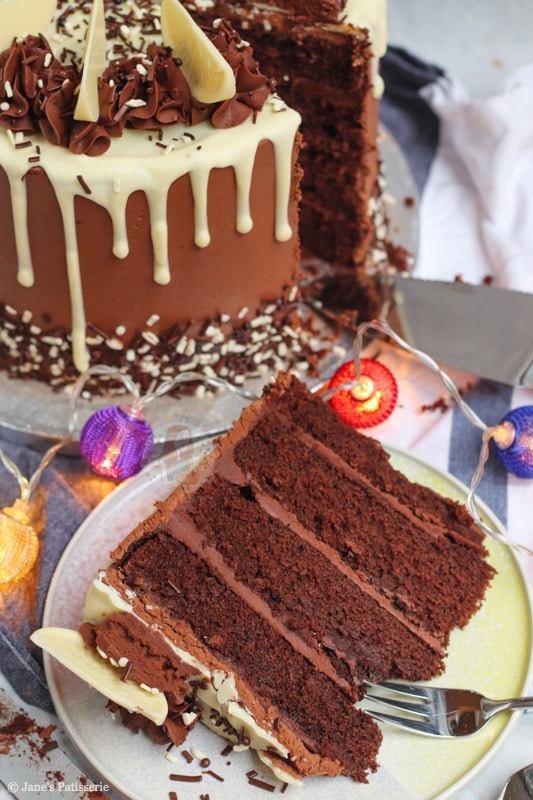
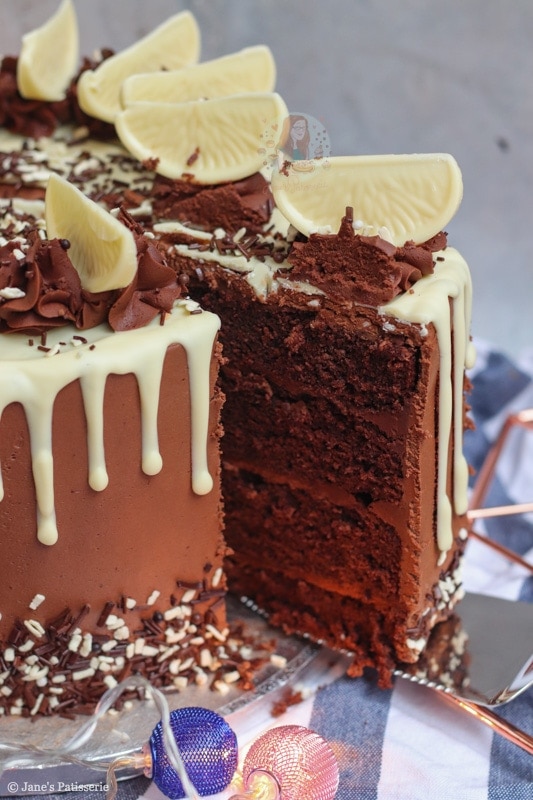
I went for a chocolate cake this year… as always. I use two of these 8″ tins when I bake deeper cakes, and I just love them! The mix does sound like a lot, because it is… a 500g/10 egg mix is massive, but as it’s split into two tins, and then each cake split into two it makes sense. Four layer cakes need a lot of mix!
Size
If you wanted to just bake a smaller version, you can half the recipe to a 250g/5 egg mix, bake into one tin, and split that into two. It’s much smaller, but might fit the smaller gatherings that are required at the moment in the world!!
Buttercream
For the chocolate buttercream, I used BLOCK BUTTER. I will say this here, like I have said so many times before… that you must not use a baking spread for buttercream. It’s too soft, and just doesn’t work! For the filling, crumb coat and topping you want a lovely firm buttercream.
When it’s colder weather, like it is now, I do tend to use 1-2tbsp of boiling water just to soften the buttercream, but in the middle of the summer I wouldn’t bother as the temperature in the kitchen is warmer! I hope that makes sense… but if you make a lot of cakes, you’ll know what I mean.
Ganache
For the ganache, it was the same idea as my other cakes, but again I used a mix of dark chocolate and milk chocolate. It’s a lighter colour than you may think as it’s a whipped ganache – you melt the mixture together, and let it sit until it reaches the peanut butter consistency.
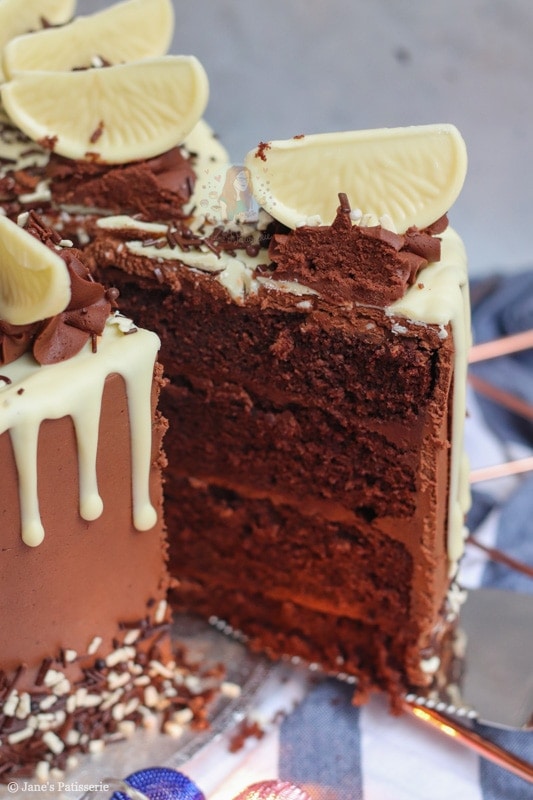
You can use it at this point, or you can whip it up with an electric whisk and it makes it a beautiful lovely fluffy mousse texture that is a wonder to work with on the crumb coated cake! I use a small angled spatula when putting on my buttercream and ganache, and a large metal scraper to smooth it over!
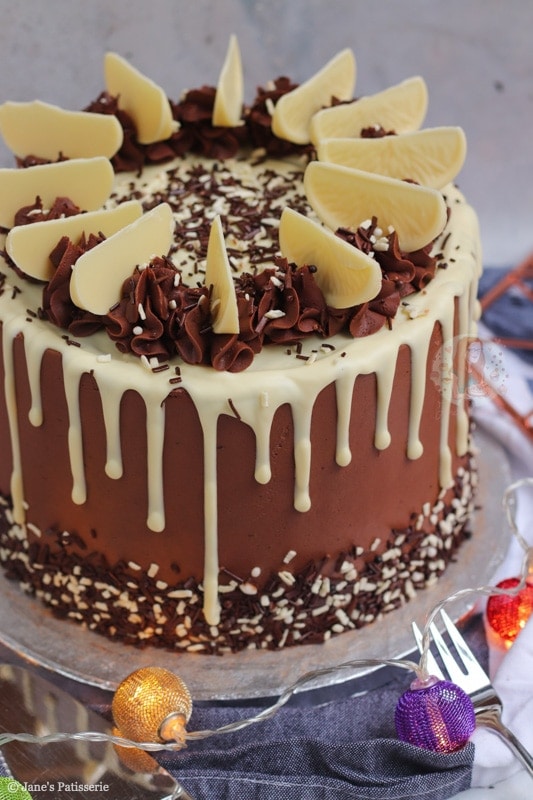
Drip
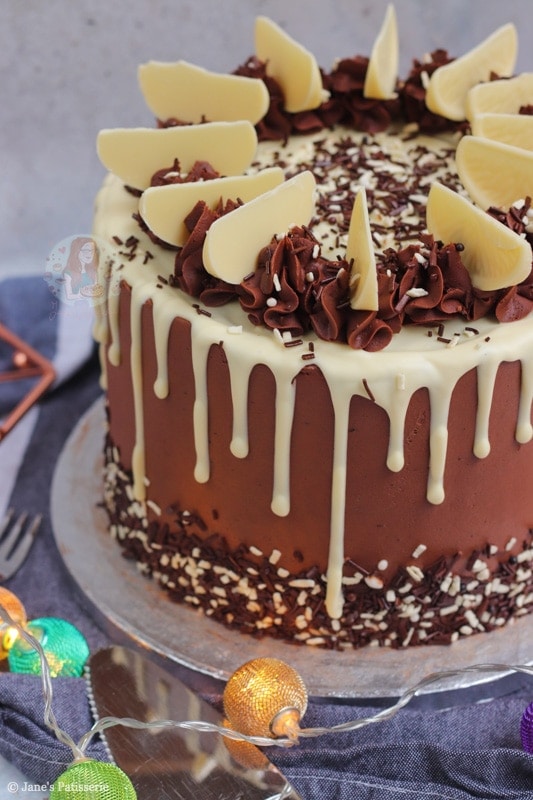
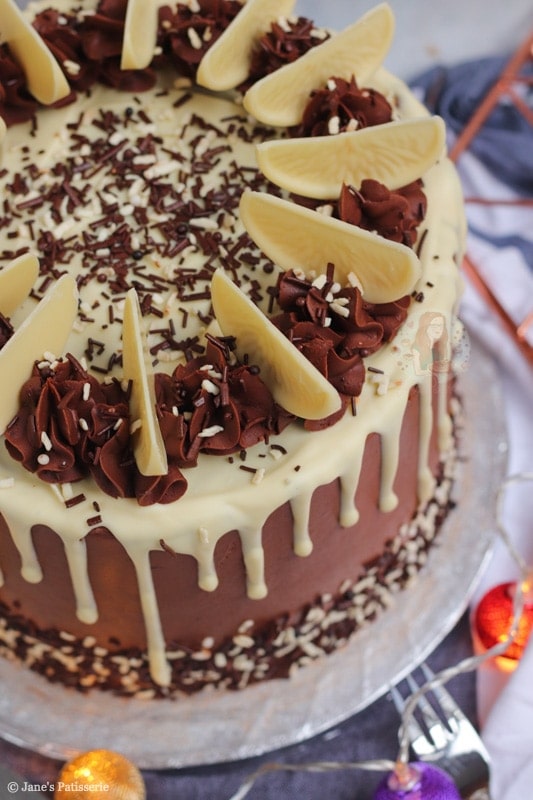
For the drip, I just used melted white chocolate. I didn’t mind that it sets firmer than a ganache.. but you can make a ganache if you want. Use 150g white chocolate, and 50ml double cream, melt together until smooth and drip! Or, add 1/2tsp vegetable oil and stir through.
Decoration
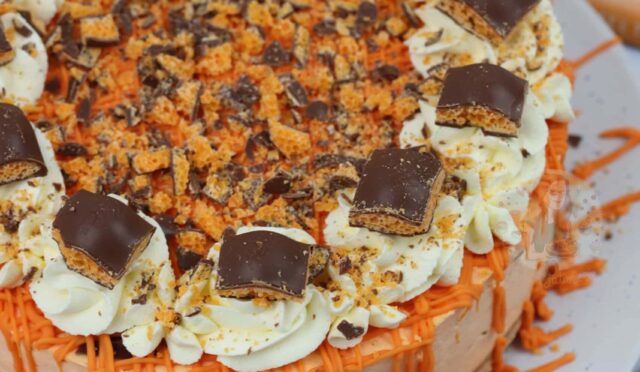
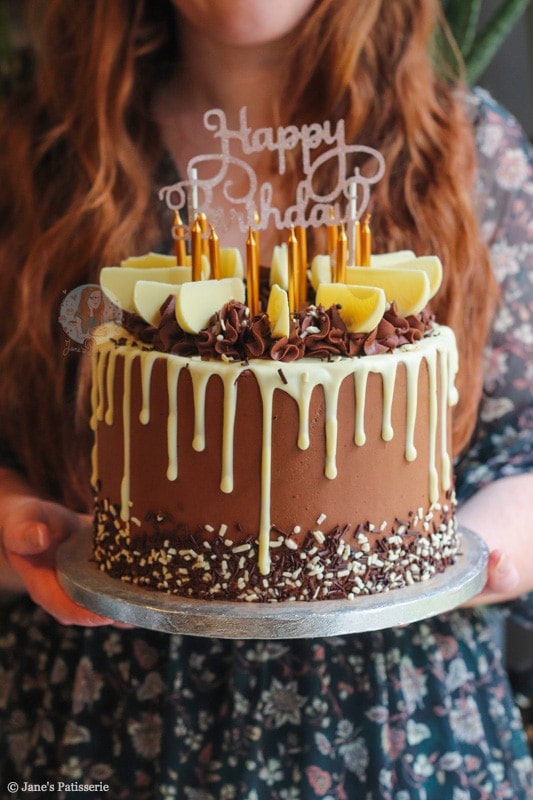
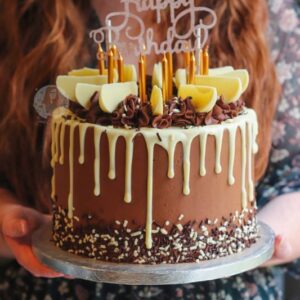
This year, I decided to press some sprinkles I had into the bottom part of the cake for a new style that I haven’t posted on my blog before – and I love it! Before chilling the cake in the fridge, lightly press the sprinkles onto the cake, and then chill to set them in.
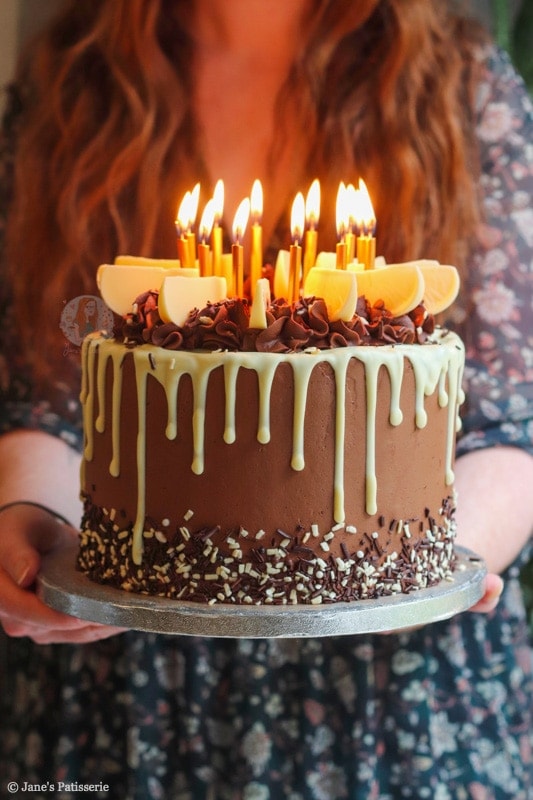
Finally, I decorated the top of the cake using my favourite 2d closed star piping tip with some leftover buttercream, some white chocolate orange segments, and some sprinkles!! If you give the cake a go, let me know! Any questions, leave them below! x
My 28th Birthday Cake!
#wprm-recipe-rating-0 .wprm-rating-star.wprm-rating-star-full svg * { fill: #343434; }#wprm-recipe-rating-0 .wprm-rating-star.wprm-rating-star-33 svg * { fill: url(#wprm-recipe-rating-0-33); }#wprm-recipe-rating-0 .wprm-rating-star.wprm-rating-star-50 svg * { fill: url(#wprm-recipe-rating-0-50); }#wprm-recipe-rating-0 .wprm-rating-star.wprm-rating-star-66 svg * { fill: url(#wprm-recipe-rating-0-66); }linearGradient#wprm-recipe-rating-0-33 stop { stop-color: #343434; }linearGradient#wprm-recipe-rating-0-50 stop { stop-color: #343434; }linearGradient#wprm-recipe-rating-0-66 stop { stop-color: #343434; }
Print Pin Rate
Ingredients
8″ Chocolate Cake
- 500 g unsalted butter
- 500 g light brown sugar
- 400 g self raising flour
- 100 g cocoa powder
- 10 medium eggs
Chocolate Buttercream
- 300 g unsalted butter (not stork) (room temp)
- 500 g icing sugar
- 75 g cocoa powder
Ganache
- 200 g dark chocolate orange (chopped)
- 150 g milk chocolate orange (chopped)
- 300 ml double cream
Drip
- 150 g white chocolate
Decoration
- Leftover Buttercream
- Sprinkles
- Chocolate Orange Segments
Instructions
For the 8″ Chocolate Cake!
-
Preheat your oven to 170C/150C fan, and line two 8″/20cm deep cake tins with parchment paper.
-
Add the butter and sugar to a bowl, and beat till light and fluffy.
-
Add in the flour, cocoa powder and eggs and beat again until a lovely smooth cake mixture is formed.
-
Split evenly between the two tins and bake in the oven for 50-60 minutes (or until a skewer comes out clean!)
-
Once baked, leave to cool in the tin for 10 minutes, and then leave to cool fully on a wire rack.
Chocolate Buttercream
-
Beat the unsalted butter on its own for a while in your mixer until its smooth and supple.
-
Add in your icing sugar and cocoa powder a little at a time and beat fully until its light and fluffy!
-
(If the mixture is really stiff, add in 1-2tbsp of boiling water and beat fully to smooth out)
For the Ganache
-
Add the the dark chocolate orange and milk chocolate orange to a large bowl.
-
Add the cream to a pan and heat till just before boiling point. Pour over chocolate and leave to sit for 5 minutes. Once sat, mix until smooth (Add back to the pan if its not quite melted).
-
Leave the ganache in a bowl and stir every few minutes until it forms a peanut butter like consistency – you can do this in the fridge as well, just make sure to stir it so it doesn’t set too quickly!
-
Whip the ganache with an electric whisk until it is fluffy, light and mousse like!
Assembly.
-
Level the cakes off if necessary. Split the two cakes into two so you have four layers in total.
-
Add your first cake to a cake board (I use a large 10″ cake board) and secure with a small amount of buttercream.
-
Spread some chocolate buttercream onto the first layer, add the second sponge. Repeat until you reach the top layer of cake.
-
Spread some chocolate buttercream around the sides to fill in the gaps and create a crumb coat. Refrigerate the cake for at least 30 minutes.
-
Once refrigerated and the ganache is ready, using an angled spatula, slather over the chocolate ganache and then smooth around using a large metal scraper.
-
Carefully press some sprinkles into the bottom of the cake (like shown in the photos)!
-
Once the sprinkles are on the cake, refrigerate the cake for another 30 minutes.
Drip
-
Melt the white chocolate until smooth. Carefully drip down the sides of the cake, and fill in the top of the cake with the chocolate!
Decoration
-
Pipe some swirls of the leftover buttercream on top using a medium 2D closed Star Piping Tip and decorate with the sprinkles and chocolate orange segments on top!
Notes
- You can swap the chocolate orange chocolates for a plain dark chocolate and a plain milk chocolate – I just love chocolate orange!
- You cannot swap the dark for just milk though – please use what is written in the recipe!
- This cake will last for 3-4 days once made.
- In this recipe I used:
ENJOY!
Find my other Recipes on my Recipes Page!
You can find me on:
Instagram
Facebook
Pinterest
Twitter
Youtube
J x
© Jane’s Patisserie. All images & content are copyright protected. Do not use my images without prior permission. If you want to republish this recipe, please re-write the recipe in your own words and credit me, or link back to this post for the recipe.